80% of people set it up wrong on day one. This is the setup that actually works, no coding experience needed.
Let me ask you something, honestly.
Have you ever opened Claude Code, typed something in, got a great answer, and then watched it completely forget everything you just told it 10 minutes later?
You're not imagining it. It's not a bug. It's a setup problem.
And the fix takes 5 minutes.
By the end of this issue, you're getting a complete, copy-paste starter kit, a ready-to-use folder setup you can drop into any project and start using immediately. No technical background needed.
Last month, I rebuilt a project from scratch after losing 4 hours to this exact problem.
I had Claude Code running. It was doing great work. Then the session got long, context got messy, and it started making decisions that contradicted everything I'd told it earlier.
I'd given Claude no memory. No rules. No guardrails.
It was like hiring a brilliant assistant and forgetting to tell them who they work for.
Here's the setup I use now. It's the difference between Claude Code that forgets and Claude Code that actually works.
Quick note:
Anthropic published the official Claude Code docs here →
docs.anthropic.com . What I'm showing you is the production setup they don't walk you through.
If this is useful, forward it to one person who's been struggling with Claude Code. It takes 10 seconds.
What's Actually Going On
Most people think Claude Code is just a smarter ChatGPT for coding.
It's not. It's closer to a full employee.
The problem is: most people give it zero onboarding. No instructions. No rules. No context about what you're building or how you work.
The fix is what I call the 5-layer setup. Think of it like building your AI assistant a proper workspace instead of just handing them a keyboard and walking away.
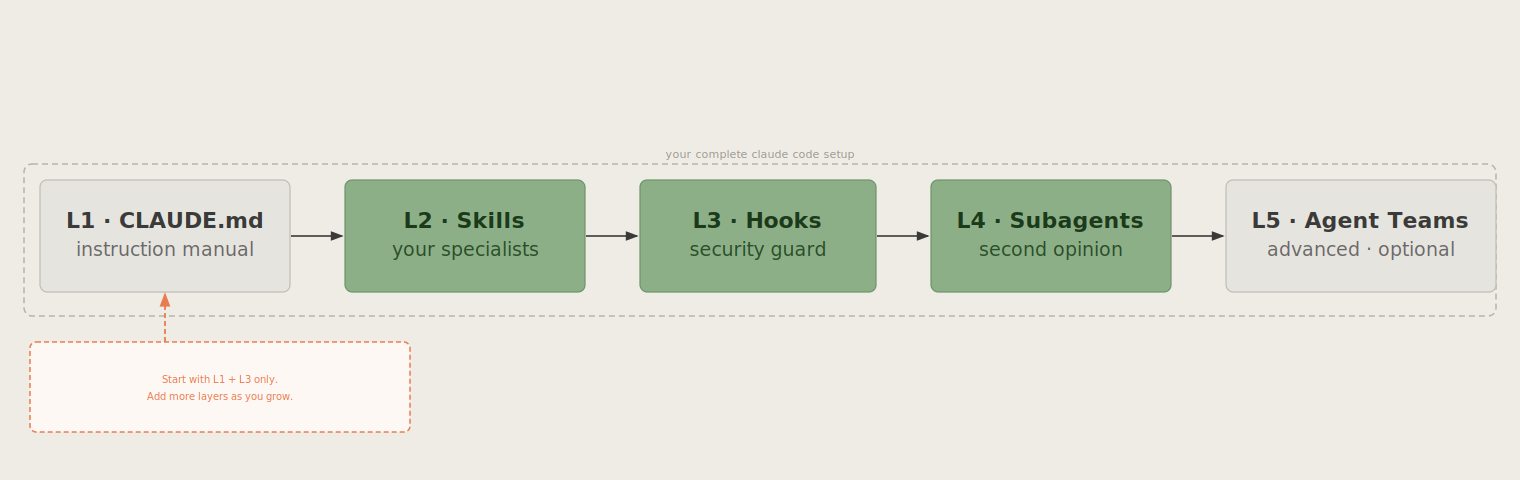
Here's what each layer does:
Layer 1 — The Instruction Manual (CLAUDE.md): A document Claude reads at the start of every single session. It's where you write your rules, your preferences, and your project details. Think of it like the onboarding doc you'd give a new team member on their first day.
Layer 2 — The Specialists (Skills): Pre-trained mini-experts you can summon for specific jobs. One for reviewing your work. One for writing descriptions. One for running tests. Claude calls them automatically when it recognises the right moment.
Layer 3 — The Security Guard (Hooks): Non-negotiable rules that can never be skipped. Things like: never delete these files. Never send anything without checking first. Always run a check before finishing. Unlike regular instructions, hooks cannot be ignored.
Layer 4 — The Second Opinion (Subagents): A fresh copy of Claude that reviews the work with zero bias. It doesn't know what your main session is doing. So it catches mistakes that the main session might miss.
Layer 5 — The Team (Agent Teams): Multiple Claude sessions working together, sharing tasks, and messaging each other. This is the most powerful setup and the newest. You probably won't need it on day one. But it exists.
Step 1: Build the Folder
Before you do anything else, your project needs a home.
Think of this like setting up a new office. You need a place for instructions, a place for your specialists, a place for your security rules, and a place for your tools.
Here's the folder setup that works:
1your-project/2├── CLAUDE.md ← The instruction manual3├── .claude/4│ ├── settings.json ← Shared rules (everyone on your team sees these)5│ ├── settings.local.json ← Your personal rules (private, not shared)6│ ├── skills/7│ │ ├── review/SKILL.md ← Your "quality checker" specialist8│ │ ├── testing/SKILL.md ← Your "bug finder" specialist9│ │ └── writing/SKILL.md ← Your "description writer" specialist10│ └── agents/11│ └── reviewer.md ← Your "second opinion" checker12├── hooks/13│ └── safety-rules.sh ← The security guard rules14└── src/ ← Your actual work goes here
How to set it up:
- Create a new folder for your project
- Copy this structure into it (we'll fill in the details in the next steps)
- The .claude/ folder is where all the Claude-specific stuff lives
Step 2: Write Your Instruction Manual (CLAUDE.md)
This is the most important step.
CLAUDE.md is the document Claude reads before it does anything. Every single session. It's your chance to tell Claude who you are, what you're building, how you like to work, and what lines it should never cross.
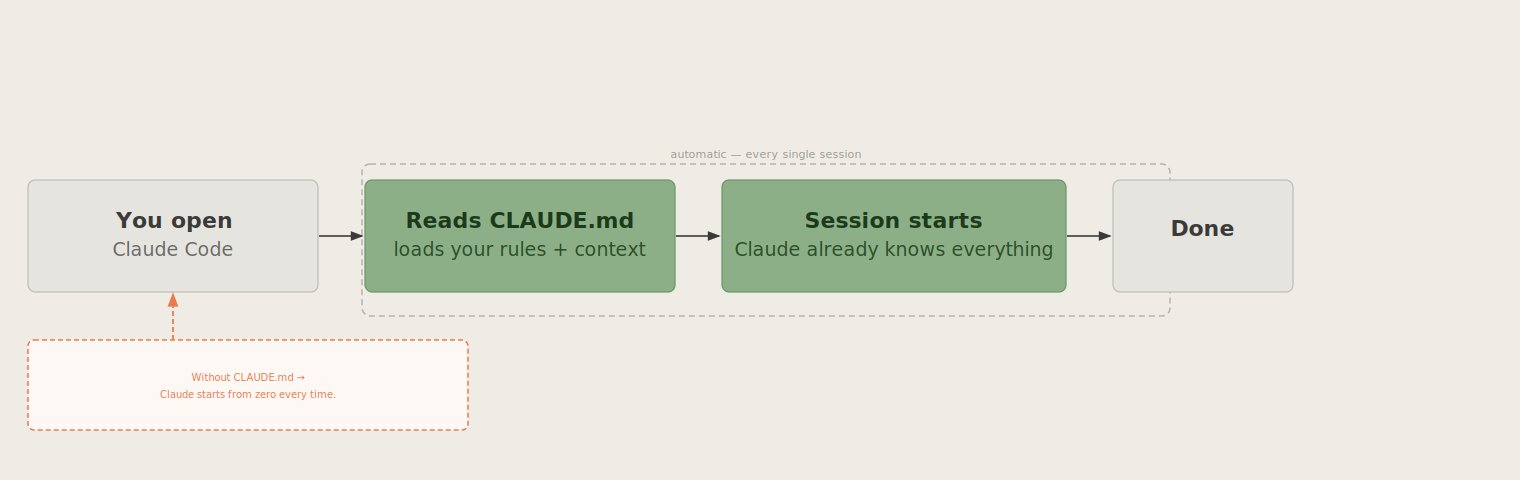
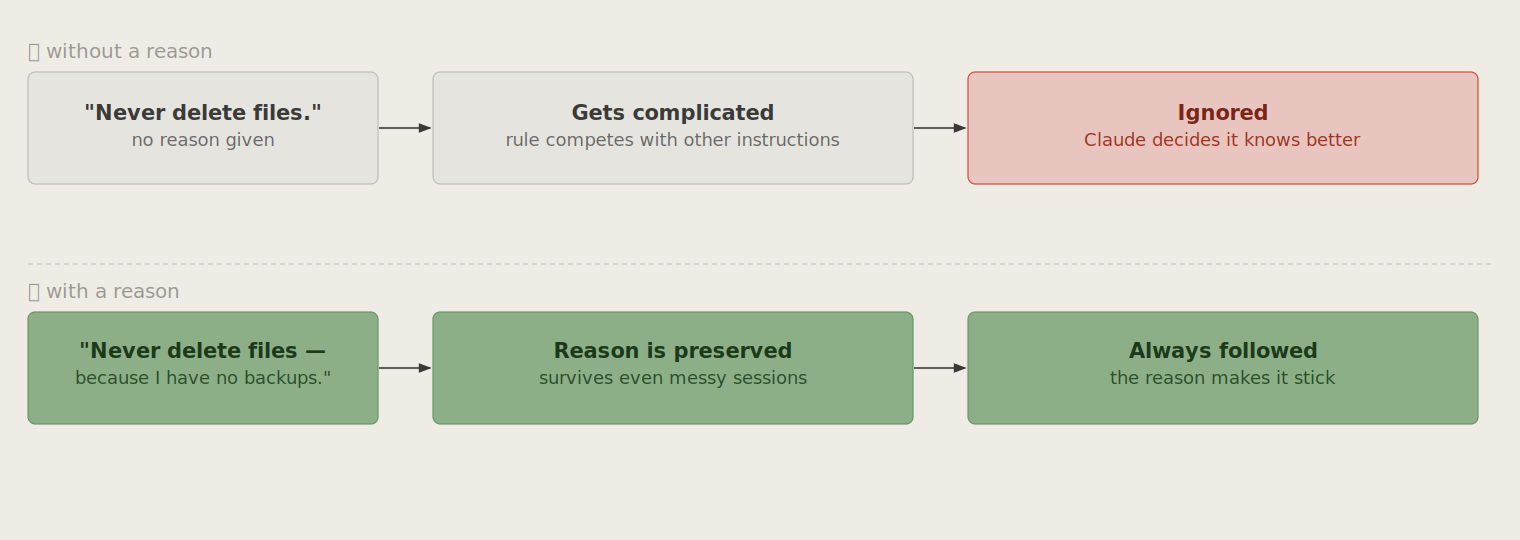
Here's a real, copy-paste template you can use right now:
1# What This Project Is2[Write one sentence about what you're building]3Example: "This is a newsletter system that turns my notes into Substack posts."45# My Tools6- I write in [your writing tool]7- I publish on [your platform]8- I store files in [where your files live]910# My Rules — Read These Every Session111. Never delete any file without asking me first — because I don't have backups122. Always show me what you're going to do before you do it — because I need to approve changes133. Keep responses short and clear — because I'm not technical and long answers confuse me144. If you're not sure about something, ask — because guessing is worse than asking155. Never change the design or layout without my permission — because branding matters1617# What I'm Currently Working On18[Write a quick note about your current project or task]1920# Things That Have Gone Wrong Before21[Optional: list anything Claude has messed up in past sessions so it doesn't repeat it]
How to fill it in:
- Run /init inside Claude Code, it creates a starter version of your project automatically
- Open the file, it creates, and replace the generic text with your real info
- Keep it under 200 lines, the shorter and clearer, the better. Claude follows it
Step 3: Set Up Your Security Guard (Hooks)
Regular instructions are great. But some rules need to be absolute.
That's what Hooks are. Think of them as a security guard who stands at the door of every action Claude takes. Before Claude does anything, the guard checks the rule. If the rule says no, it stops.
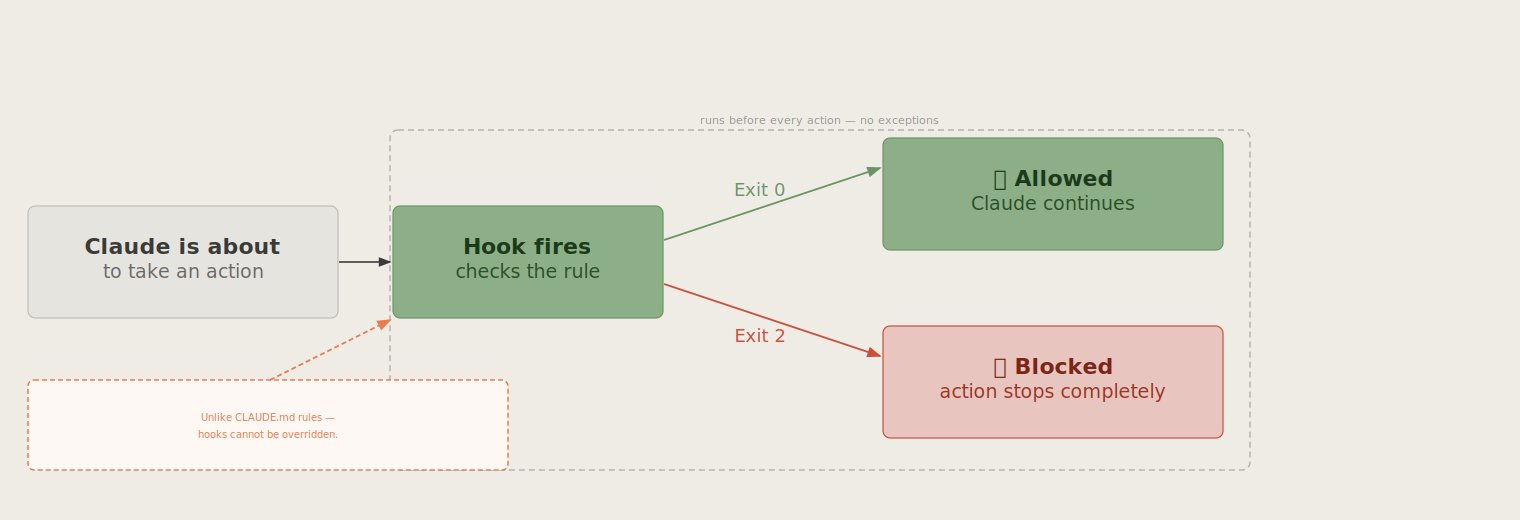
Here's what hooks look like in plain English:
Rule 1 — The Before Check (PreToolUse) "Before Claude makes any changes, check if it's about to touch something important. If yes, stop and ask me first."
Rule 2 — The After Check (PostToolUse) "After Claude makes a change, automatically run a quality check and flag anything that looks off."
Rule 3 — The Notification (Notification) "When something important happens, send me a heads-up so I know what's going on."
Here's what your safety rules file actually looks like inside:
1{2 "PreToolUse": [{3 "matcher": "any file change",4 "hooks": [{5 "type": "command",6 "command": "./hooks/check-before-changing.sh"7 }]8 }],9 "PostToolUse": [{10 "matcher": "any write",11 "hooks": [{12 "type": "command",13 "command": "./hooks/check-after-changing.sh"14 }]15 }]16}
Translation: Before touching anything, run a check. After touching anything, run another check.
The exit codes work like a traffic light. Code 0 = green, go ahead. Code 2 = red, stop completely.
Slow down here for a second.
I know this step looks like the most technical part. It isn't. The key thing to understand is this: hooks are the one part of your setup that Claude genuinely cannot ignore. Everything else, your CLAUDE.md, your rules, your preferences, Claude can technically override if it decides it knows better. Hooks cannot be overridden. That's why they matter. Set them up once and forget about them.
Step 4: Create Your Specialists (Skills)
Here's where things get genuinely exciting for non-technical people.
A Skill is a pre-written specialist that Claude summons automatically when it recognises the right moment. You're not training a model. You're just writing a plain-English description of an expert you'd like to have on call.
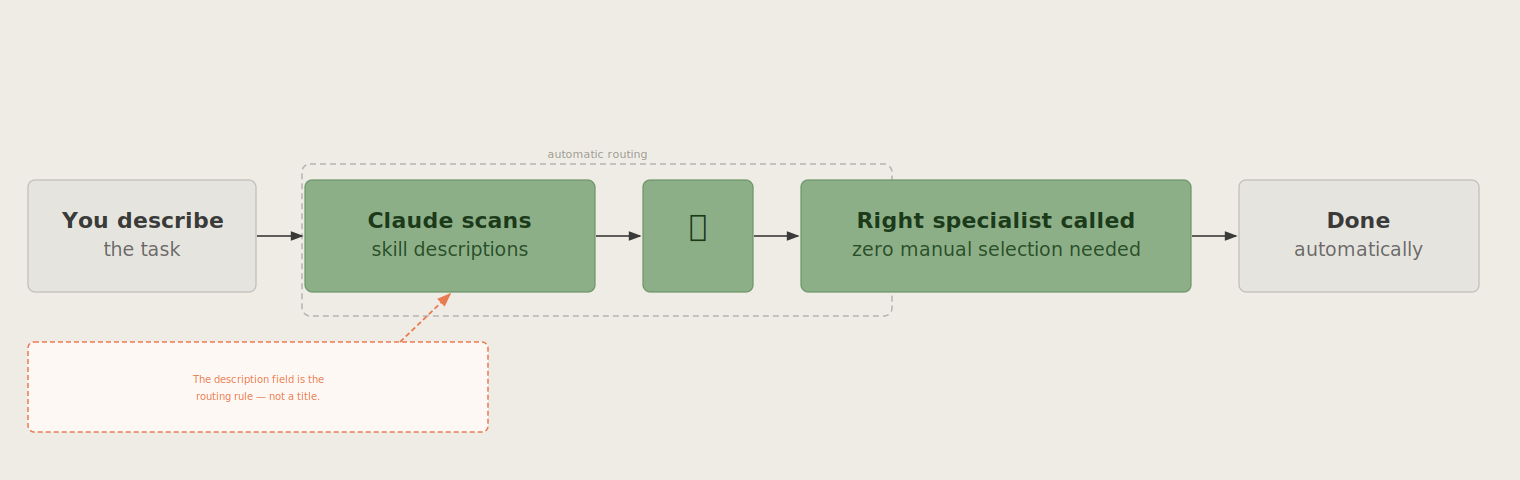
Here's a real example. This is a "quality reviewer" Skill:
1Name: quality-reviewer23What this specialist does:4Reviews any work I've created and checks for:5- Spelling and grammar mistakes6- Anything that sounds confusing or unclear7- Missing information8- Anything that doesn't match my usual style910How to use this: Call it after any major piece of work is finished.1112What to look for: Read the work carefully. List any problems. Don't fix them — just flag them.1314What to return: A short list of issues found. Rate each one as minor, medium, or major.
That's it. Claude reads this and knows exactly what kind of specialist it's talking to.
The magic part: you can have a specialist for anything. A "tone checker" that makes sure everything sounds like you. A "headline writer" who rewrites your titles to be more engaging. A "simplifier" that turns complex text into readable text. You write the job description once. Claude automatically calls the specialist whenever needed.
Step 5: Set Up Your Second Opinion (Subagents)
This is the quality gate most people never use. And it's the one that catches the most mistakes.
A Subagent is a completely fresh copy of Claude that looks at the finished work with zero context from your main session.
Think of it like asking a colleague to review your work before you send it. Except the colleague is fast, never gets tired, and has no reason to just tell you what you want to hear.
Here's what a simple subagent setup looks like:
1Name: second-opinion-checker23What this reviewer does:4Looks at finished work and checks if it's actually good.5Has no knowledge of how the work was created.67What to check:8- Does this actually answer what was asked?9- Is there anything missing?10- Does this look like quality work to someone seeing it for the first time?1112Important rule: This reviewer can only read. It cannot make changes.13Report findings only.
The rule that matters:
Your second-opinion checker should never be allowed to make changes. It reads and reports. That's it. If it can edit, it becomes part of the problem instead of the solution.
Step 6: Run the Daily Workflow
With your setup in place, every Claude Code session follows the same simple pattern.
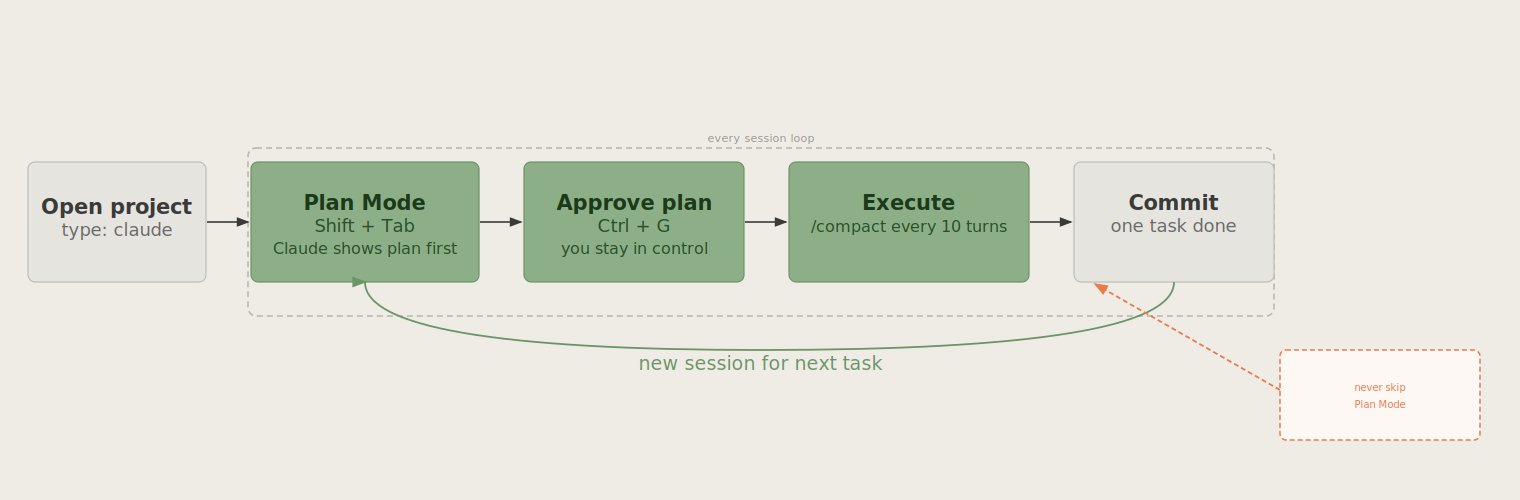
Morning startup:
1Open your project folder → type "claude" → press Enter
Before Claude writes anything: Press Shift + Tab to enter Plan Mode. This makes Claude tell you exactly what it's going to do before it does it. Review the plan. Approve it. Then let it work.
During the session: Type /compact every 10-15 minutes. This compresses the conversation so Claude doesn't get confused by too much history.
When you finish a task: Save your work and start a fresh session for the next task. Don't let one session run forever. Fresh sessions mean fresh thinking.
The two keyboard shortcuts worth memorising:
- Shift + Tab → Plan Mode (Claude shows you the plan first)
- Esc Esc → Rewind (undo the last thing Claude did)
That's the whole daily pattern. Plan. Approve. Execute. Check. Save. New session.
Real Use Cases (For Non-Technical People)
Content creators: Use the quality-reviewer Skill after every piece of content. Use the tone-checker Skill to make sure everything sounds like you, not like AI. Use the headline-writer Skill to get 5 title options for every post.
Business owners: Use CLAUDE.md to store your brand rules, your customer persona, and your product details. Claude will reference these automatically in every session without you having to repeat them.
Newsletter writers: Use Hooks to make sure Claude never publishes anything without your review. Use a Subagent to check every issue for clarity before it goes live.
Freelancers: Create a separate CLAUDE.md for each client. Switch between them when switching projects. Claude will automatically adapt to each client's rules and preferences.
These are the use cases that matter. Start with one that fits your work. Add more as you go.
In 20 Seconds
→ Create the folder structure before you do anything else.
→ Write your CLAUDE.md instruction manual with real rules
→ Set up Hooks for the rules that can never be broken.
→ Add Skills for any task you repeat more than three times.
→ Use a Subagent to check finished work before it leaves
Save this. Screenshot it. Come back to it.
What's your biggest frustration with Claude Code right now?
- It keeps forgetting my instructions
- I don't know how to set it up properly
- I'm not sure where to start
Comment below, this will help us create the next dedicated guide for you. I read and reply to every comment.
Your free starter kit — as promised:
I'm sending a $99 Claude Code starter kit to my newsletter subscribers.
What's inside:
→ Pre-filled CLAUDE. md template (ready in 5 min)
→ Quality-reviewer Skill you can use today
→ Subagent setup template
It goes out in the next newsletter.
Subscribe free → https://substack.com/@humzakhalid
Next issue: I'm testing the /goal feature inside Claude Code, the one that keeps your intent locked across the entire session so Claude never drifts off track. It's the biggest quality-of-life update they've shipped this year. Don't miss it.
We tested it in public. Now go use it in private.
See you in the next article.
— Hamza 💙